Creating simple nail designs is fun, but it can be a lot of work maintaining the beauty of your nails. Sometimes it's easier to paint your nails right out of the bottle and keep it going. Fortunately, simplicity meets creativity with this nail design.
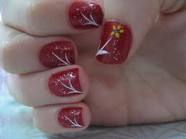
Creating simple nail designs on the thumb or ring finger only is gaining popularity. It allows you to add a bit of interest to your nails. One of the easiest things to do is draw some random lines on top of your nail polish. For a base color, choose red like in the photo or whatever your preference. Simple nail designs that use black and white lines look best on red, blue, black and pale backgrounds. You can also choose different colors to draw your lines with, but black and white are popular. Just make sure to use a nail art brush so that your strokes are nice and thin. If you do not have a nail art brush, you can use regular nail polish, but be careful that your lines are not too thick.
Finishing up your simple nail designs
Starting with the left side of your nail, draw several black and white strokes. These lines will almost look like they are extending from the same place. Make sure your lines vary in length to add necessary randomness. Your lines should also curve a bit either upwards or downwards like in the picture.
On your other ring finger, you have the option to create similar designs or to be spontaneous and change it up. Both looks will look great. If you decide to change it, this time you should start at the upper left-hand corner of your nail.
Taking your nail art brush, create several lines that curve downward. Alternate between black and white nail polish lines to add flair!


No comments:
Post a Comment